Installing an LED display screen isn’t a simple task. If you’re planning to install an outdoor LED display, this guide is for you. We will guide you the full step-by-step process for outdoor steel structure cabinet installation.
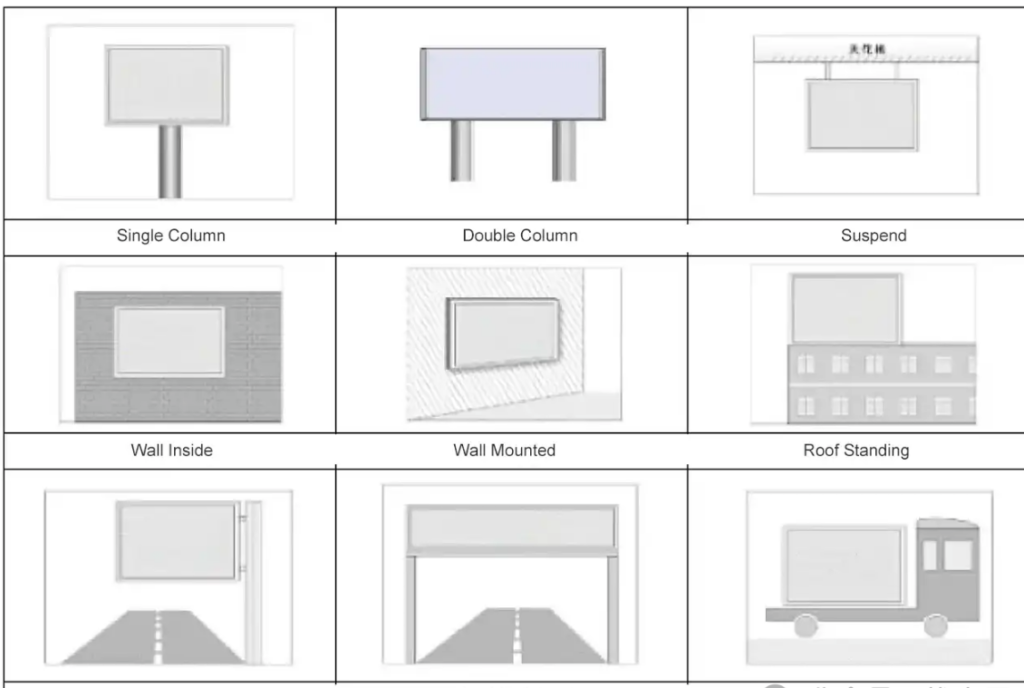
Types of LED Display Installation Methods
There are five main types . Each has its own use case:
- – Cabinet installation directly on a steel structure
- – Cabinet installation directly on a wall
- – Cabinet placement on a portable or temporary setups
- – Cabinet suspension from a boom
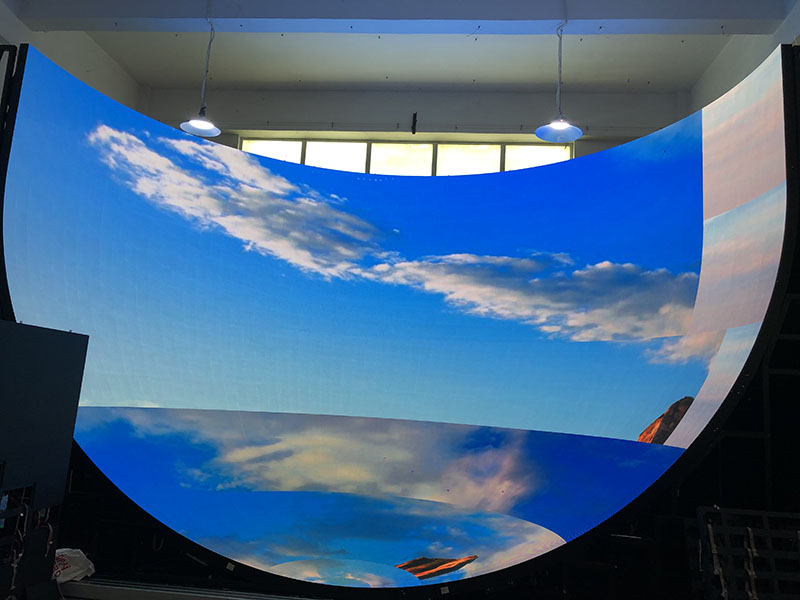
- – Direct assembly of LED modules on a steel structure (no cabinets, for custom shapes)
Among these, steel structure cabinet installation is the most common for large outdoor displays. It is perfect for harsh outdoor environments.
Full Installation Process of Outdoor Steel Structure Cabinet LED Displays

First, let’s clarify what an LED cabinet is. It’s an independent display unit. It integrates LED modules, power supplies, receiver cards, data cables, power cables, and HUB cards. You can quickly assemble cabinets into a large display without the complex operations .
Pros and Cons of Steel Structure Cabinet Installation
Before diving into the steps, let’s know the advantages and disadvantages.
Advantages
- – Strong Protection: The sturdy cabinet shell protects LED modules from physical damage and environmental erosion.
- – Simplified Installation: The modular design significantly reduces operational difficulty.
- – Easy Transportation: Cabinet structures are easy to carry and transport.
- – Efficient Assembly: You can quickly complete splicing and configuration, cutting down on installation time.
- – Convenient Wiring: Internal wiring is reasonably arranged
- – High Stability: The cabinet provides high-strength protection for internal components.
Disadvantages
- – Higher Cost: Compared to direct module installation, the manufacturing cost of cabinets and supporting structures is relatively high.
- – Larger Space Requirement: The overall space occupied is more than that of simple module installation. You’ll need to account for extra space for the cabinet structure.
Despite the downsides, thanks to the stability and protection of steel structure cabinet installation, it is worth the investment for most outdoor projects. Now, let’s move to the step-by-step process.
9 Steps to Complete Outdoor Steel Structure Cabinet LED Display Installation
Step 1: On-Site Environment Survey
Before you start any installation work, you need to conduct a comprehensive survey of the target location. You can focus on these core areas:
– Basic Conditions:
Evaluate if the space at the installation location is large enough to accommodate the steel structure. Also, you can check if the building’s load-bearing capacity to support the total weight and size of the LED screen. A weak structure could lead to serious safety hazards later.
– Environmental Factors:
Take note of terrain features, rainfall and storm frequency, extreme temperatures , maximum wind speed, ambient light intensity, and potential obstructions like trees or other buildings.
– Supporting Resources:
You should confirm the convenience of power access and the stability of the network connection. Without reliable power and network, the display won’t work properly.
Step 2: Calculate the LED Screen Size
Based on the results of the on-site survey, determine the screen size.
– First, you need to clarify the overall screen size. A screen that’s too small won’t be visible from a distance; one that’s too large may waste space and money.
– Next, combine the size of a single LED cabinet to calculate the total area of the display area. Add up the area of each cabinet to get the total display size.
– Finally, include the size of the supporting steel frame. The frame needs to be strong enough to hold the cabinets and resist outdoor elements.
A key reminder:
Make sure the installation location has enough space to accommodate the total occupied area of the frame plus the screen. Don’t forget to leave extra space for maintenance if needed.
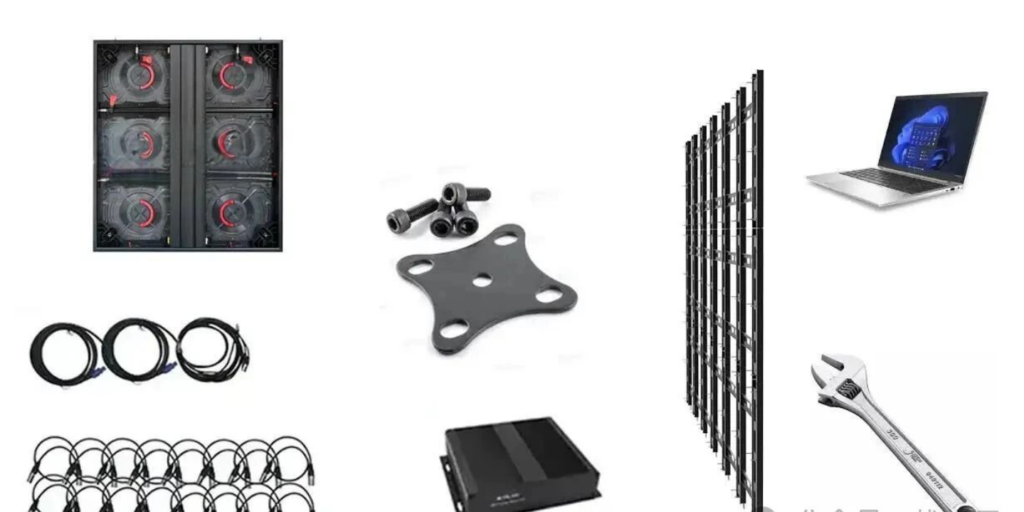
Step 3: Prepare Materials and Tools
Gather all components in advance to avoid interruptions during installation. Nothing slows down a project more than stopping to find a missing tool or part. Here’s a must-have list:
– Core Equipment: LED screen cabinets, LED controller or video processor.
– Wiring Materials: Power cables, data network cables, USB control cables, DVI/HDMI/VGA cables.
– Structural Materials: Steel structure, bolts, connecting plates, 4×4cm or 4×8cm rectangular tubes . It is the main body of the frame.
– Tools and Safety Gear: Wrenches, a laptop for debugging, welding equipment, electric drills, fasteners. Also, you don’t forget worker safety equipment like helmets and safety belts.
Step 4: Build the Frame According to Measurement Results
Using the measurement data from Step 2, build a sturdy frame with 4×4cm or 4×8cm rectangular tubes as the main structure. Assemble the frame by welding, and keep these points in mind:
– Ensure the frame is level and fixed firmly. It needs to withstand wind, rain, and other outdoor factors without shifting or shaking.
– Reserve a maintenance channel. If you plan to maintain the screen from the back, leave 600-900mm of space. If the screen is front-maintainable, you won’t need a dedicated rear channel.

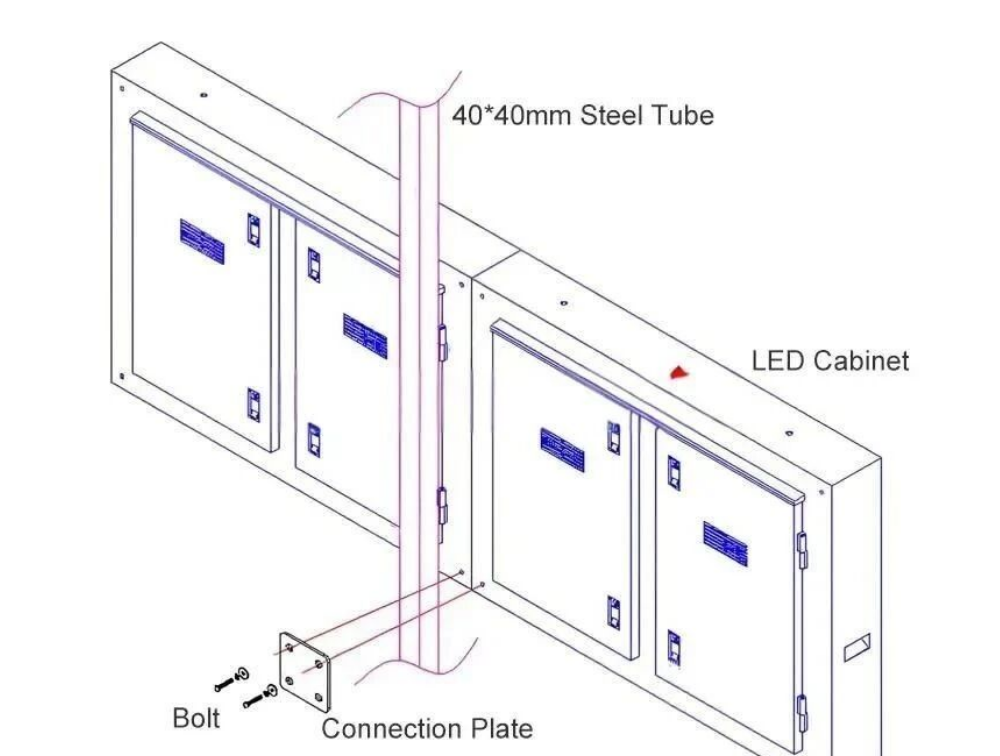
Step 5: Fix the LED Cabinets to the Steel Structure
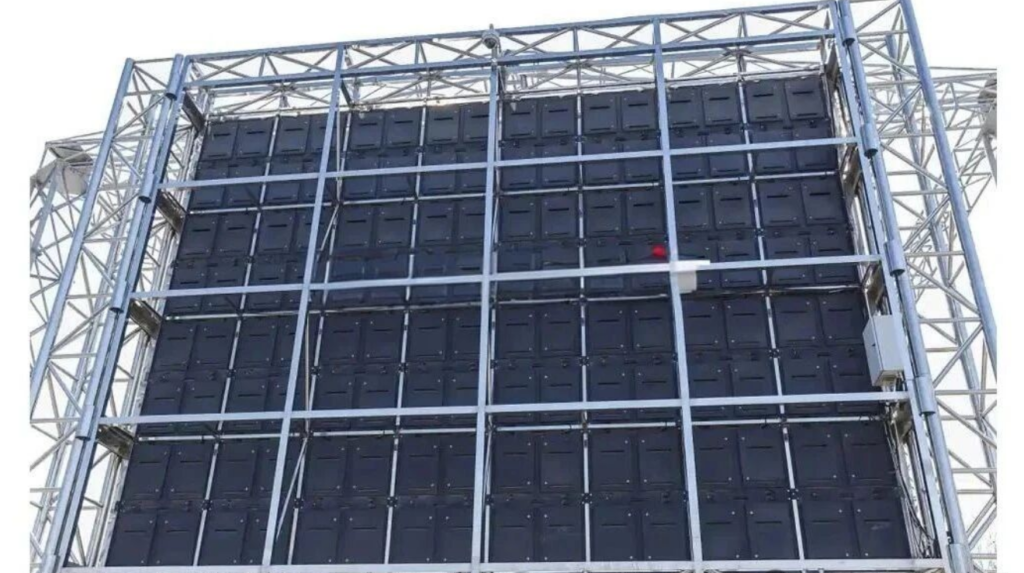
Now it’s time to attach the cabinets to the frame. You can Follow these sub-steps:
– Place the Cabinets: Carefully place each cabinet on the steel frame. Make sure they are aligned and level.
– Temporary Fixation: Use temporary supports or clamps to stabilize the cabinets.
– Connect the Plates: Use the connecting plates behind the 40×40mm rectangular tubes to attach the cabinets tightly to the frame.
– Bolt Fastening: Use M10×60mm bolts to pass through the connecting plates and rectangular tubes. Fix the cabinets at all connection points.
– Even Force: Tighten all bolts evenly. Uneven force can cause local stress, which may damage the cabinets or frame over time.
– Check Sealing: Confirm that all cabinets are firmly connected with no gaps.
Step 6: Connect the AC Power Cables
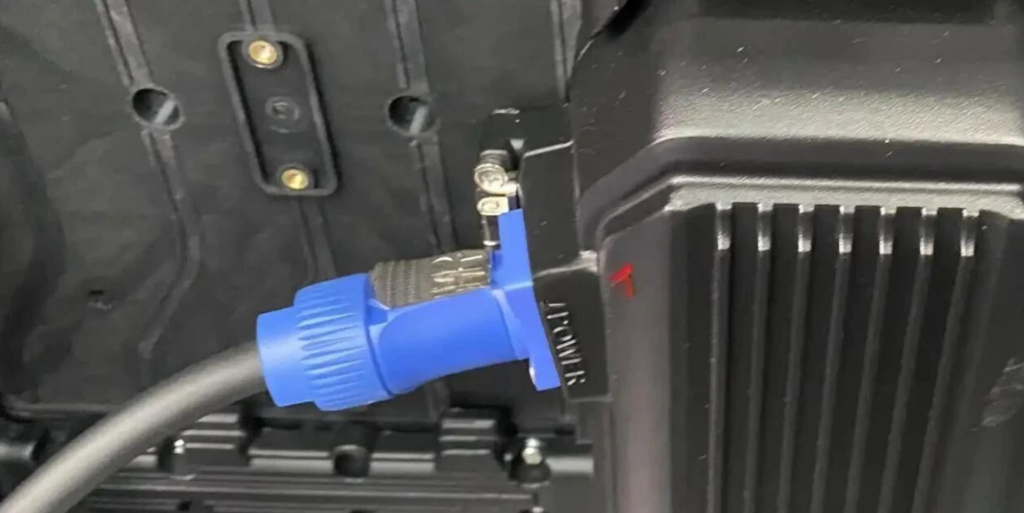
Wiring is a crucial step. You can Follow these guidelines:
– Port Identification: Most cabinet backs have two ports: “POWER IN” (main power input) and “POWER OUT” (daisy-chain output).
– Wiring Method: Use AC power cables to connect the distribution box to the first cabinet’s “POWER IN” port. Then, you can use the “POWER OUT” port to daisy-chain the remaining cabinets.
– Specifications and Requirements: Use 3-core 2.5mm² cables. Connect brown to live wire, blue to neutral wire, and yellow-green to ground wire.
For load calculation:
a single cable can handle about 3.6KW. If each cabinet has 3 300W power supplies (total 900W), one cable can connect up to 4 cabinets (3600W ÷ 900W = 4).

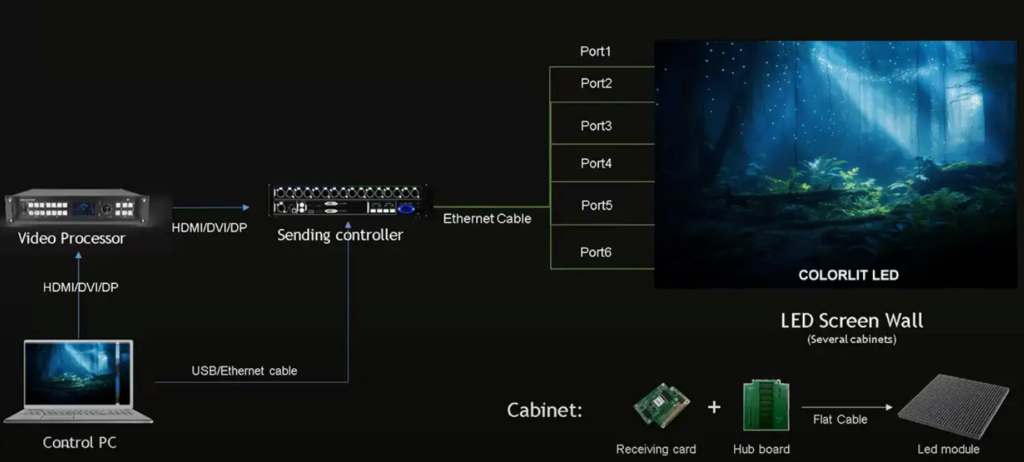
Step 7: Connect the Signal Cables
Signal cables transmit the content you want to display. You can follow these steps to ensure a stable signal:
– Basic Connection: Use HDMI/DVI or Ethernet cables to connect your laptop to the LED controller. Then, use Ethernet cables to connect the controller’s output to the first cabinet’s input.
– Daisy-Chain Expansion: Connect the first cabinet’s output to the next cabinet’s input. Repeat this until all cabinets are part of the signal chain.
– Load Limit: Ensure the total pixel pitch of the daisy-chained cabinets is within the maximum load range of the LED controller’s output port. Overloading the controller will cause display issues like flickering or no signal.
Step 8: Configure the LED Screen and Test
Once all wiring is done, it’s time to configure the screen and test if everything works. Here’s how:
– Software Selection:
Download the corresponding software based on your control system brand. For example, Novastar’s NovaLCT or Colorlight’s LEDVsion. You can get these software tools from the brand’s official website.
– Configuration Import:
If your supplier provided a configuration file ,like Linsn’s RCG or Novastar’s RCFGX, import it directly into the software. If not, use the software’s “smart setup” feature to create a new configuration.
– Test Run:
After completing the configuration, send test content to the screen. Check if the entire screen displays correctly. You can look for dead pixels, color inconsistencies, or signal drops.
Step 9: Post-Installation Inspection
Don’t call the project done yet. Conduct a comprehensive inspection to ensure everything is safe and functional:
– Environmental Adaptability:
Confirm that wind and waterproof measures are in place. The cabinets should be sealed tightly, and the frame should be able to resist strong winds.
– Structural Stability:
Check if the steel structure has any loose parts. The entire structure should be firm and not shake when touched.
– Wiring Safety:
Double-check power and signal cable connections for potential hazards. Make sure all cables are securely connected and not exposed to damage.
Once you’ve completed all these steps, the installation of your outdoor steel structure cabinet LED display is fully finished. You can now start using it to display content!
Final Thoughts
We have guide you Installing an outdoor steel structure cabinet LED display . If you’re unsure about any step, don’t hesitate to consult us. With the right preparation and care, we believe your LED display will provide reliable service for years to come.