Outdoor curved LED screens have become a popular solution for landmark advertisin. Compared with traditional flat LED billboards, curved LED displays offer a more flexible aesthetic, a wider viewing angle, and a more eye-catching appearance. Today, Sight LED will guide you these screen details.
What Is an Outdoor Curved LED Screen?
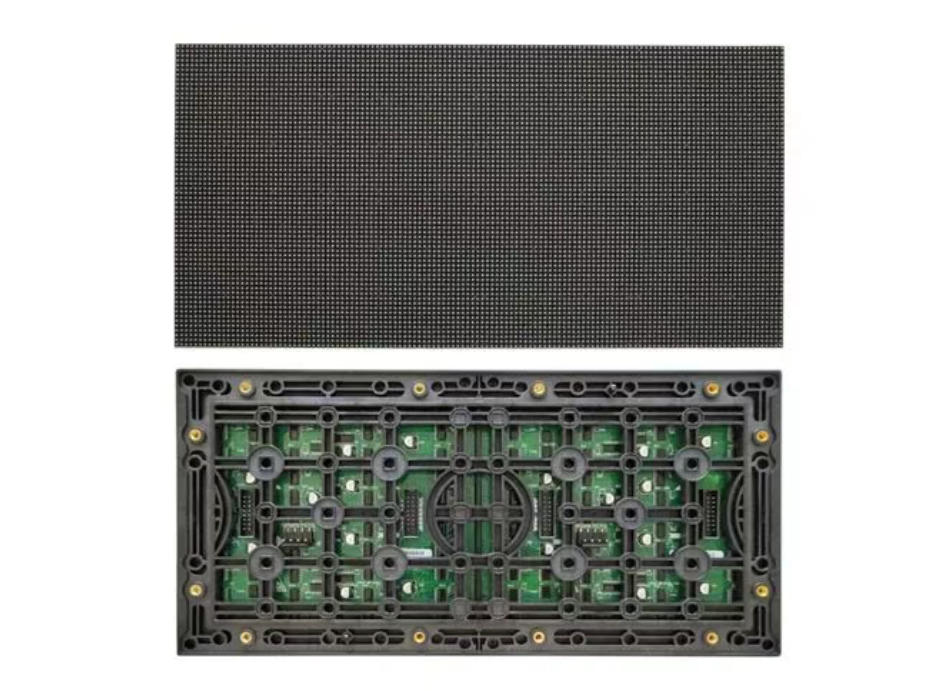
An outdoor curved LED screen refers to a large-format LED display adopts a non-flat, curved shape. It is either concave, convex, cylindrical, or multi-segment. Unlike a conventional rectangular screen, they use specially designed cabinets or modules to bend within a specified radius.
SightLED’s Outdoor curved LED screens are built using 6500+ high-brightness, IP65 waterproof, and UV-resistant LED technology.
Curved screens offer several advantages:
- Wider viewing coverage
- Better visual flow
- Higher impact
- Flexible installation
Types of Outdoor Curved LED Display Screens
Outdoor curved LED display can be categorized by installation type and structural curvature type.
Classification by Installation Type
- Fixed Installation Advertising Screens
- These are permanent outdoor displays commonly used on:
- Commercial building walls
- Rooftops
- Street advertising billboards
- Stadium perimeters
- Transportation hubs
Characteristics:
- Heavy-duty steel structure
- Waterproof power and signal systems
- Long-term durability
- Maintenance platforms are required
Customized curvature based on architectural layout
Fixed curved LED outdor screens usually have larger sizes and stricter structural safety requirements. Because they operate 24/7 and must resist long-term climatic stress.
Rental / Stage Curved LED Screens
Rental curved LED panels are frequently used for:
- Outdoor concerts
- Temporary exhibitions
- Touring events
- Festivals
- Sports event stages
Characteristics:
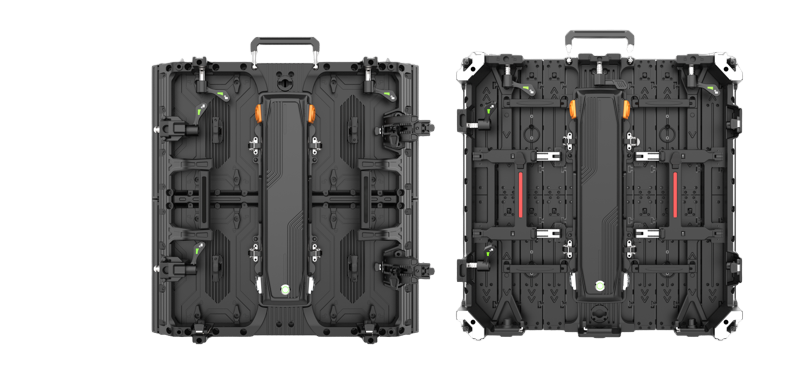
- Lightweight die-cast aluminum LED cabinets
- Quick lock mechanism for fast assembly
- Can form inner (concave) or outer (convex) curves
- Adjustable curve angle, typically ±10° to ±20° per cabinet
- Instead of a fixed steel structure, rental screens use truss systems, stacking systems, or hanging bars. Curvature is achieved by locking angles between cabinets.
Classification by Curvature / Structure Type
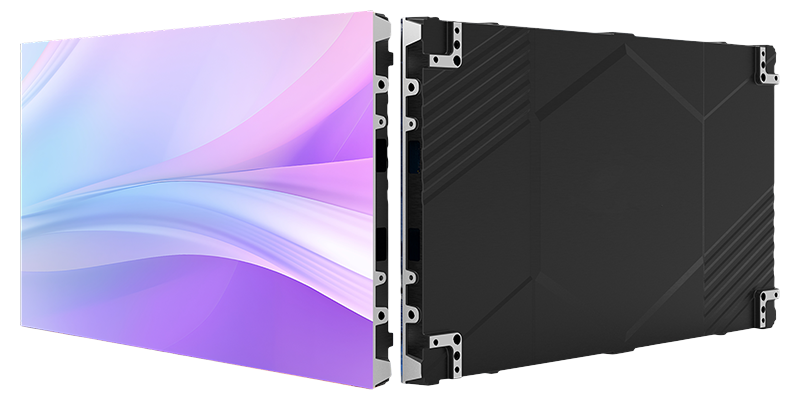
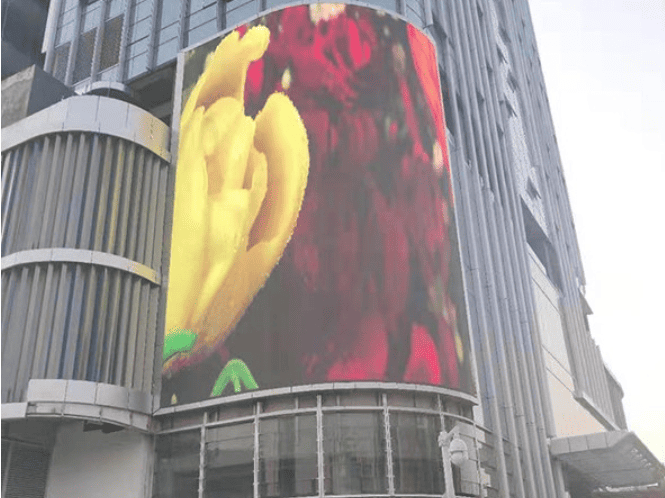
Outer Curved LED Screen (Convex)

These screens bulge outward toward the audience. You can think of a half-cylinder sticking out from a wall.
Advantages:
- Strong visual impact
- Suitable for rounded corners or column wrapping
- Excellent viewing angle from the sides
- Used in commercial complexes and road-facing billboards.
Inner Curved LED Screen (Concave)
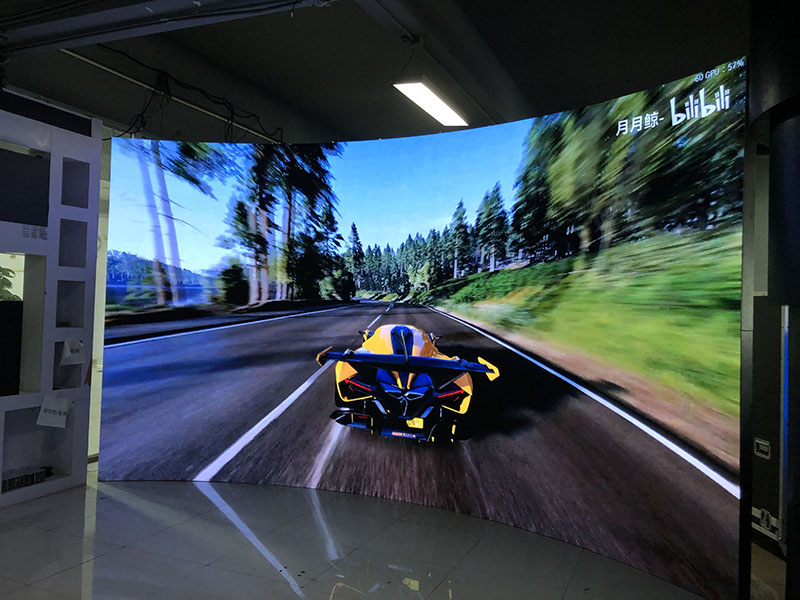
Concave screens curve inward, like the inside of a bowl. It focus visuals toward a central audience area.
Advantages:
- Enhanced immersion
- Better audience focus
- Suitable for control centers, plazas, and stage backgrounds
Multi-Segment Curved LED Screen
Instead of one continuous radius, the screen consists of several straight segments joined at angles.
Advantages:
- Lower manufacturing cost compared with seamless curvature
- Easier for maintenance
- Combines flexibility and modularity
- Applications
- building façades
- architectural integration
Other Curved Configurations Include:
- 360° cylindrical LED screens
- Elliptical LED screens
- Wave-shaped LED screens
- S-curves and artistic LED façades
How to Design the Steel Structure for Outdoor Curved LED Screens
If the LED modules are the “face” of the display, the steel structure is its backbone. You should consider four critical things: supports the screen’s weight,
- maintains precise curvature,
- protects against weather,
- ensures safety.
Let’s break down the key engineering principles.
Load Calculations:
Outdoor curved screens face a barrage of forces. Your steel structure must handle all of them.
Dead Load (Permanent Weight)
This is the weight of the screen and all its components: LED cabinets/modules, cables, power supplies, and the steel structure itself. Calculate this using actual product specs. The LED cabinet weighs 25–35 kg/㎡ and steel density ≈7850 kg/m³ for structura steel.
Wind Load
Outdoor screens act like giant sails, catching wind and creating enormous pressure. Ignore wind load, and your screen could topple in a storm. Here’s how to calculate it (simplified for practical use):
Wind Load (W) = Velocity Pressure (qₓ) × Pressure Coefficient (Cₚ) × Projected Area (A)
- – qₓ: Velocity pressure at the screen’s height
- – Cₚ: Pressure coefficient (curved screens amplify wind force: add 20% for convex, 10% for concave).
- – A: The screen’s projected area (width × height).
Engineering best practice:
- You can use a safety factor of at least 1.5× the calculated wind load.
- For coastal or typhoon-prone areas (wind speeds ≥45 m/s), bump that to 2.0×.
Seismic Load
While less critical than wind in most places, seismic forces can’t be ignored in earthquake zones. You can follow local building codes for equivalent static seismic load calculations. using a seismic importance factor of 1.0–1.5.
Live Load
This includes the weight of technicians during maintenance, snow, or debris. Plan for at least 2.5 kN/㎡ of live load to ensure safety during service.
Curvature Precision:
The biggest visual flaw in a curved LED screen is uneven curvature. The gaps between modules, visible “steps” in the arc, or a distorted image. To avoid this, your steel structure must maintain precise curvature with minimal deviation.
Key Curvature Metrics to Calculate
First, define your radius (R): the distance from the center of the imaginary circle the curve follows to the screen’s surface.
For a simple arc, use this formula:
R = W / [2 × sin(θ/2)]
Where:
– W = Chord width (straight-line distance between the arc’s two endpoints)
– θ = Central angle (the angle at the circle’s center between the two endpoints)
For multi-segmented screens (polygonal curves), calculate the radius for each segment individually:
Rᵢ = Lᵢ / [2 × sin(αᵢ/2)]
Where:
– Lᵢ = Width of one segment
– αᵢ = Bending angle per segment
Tolerance Requirements
To keep the screen looking seamless:
- – Radius deviation: ≤ ±2–3% (e.g., a 10m radius can vary by no more than 0.3m).
- – Cabinet alignment: ≤ 1.5mm gap between adjacent cabinets.
- – Surface flatness: ≤ 2mm deviation per row of modules.
- Any more than this, and viewers will notice gaps or distortion.
How to Ensure Precision?
Use full-scale curvature templates during fabrication to test each steel arc. Build a small mockup of the screen and steel frame before full installation. This lets you catch curvature issues early. For large projects, you can use 3D laser scanning to verify that the fabricated steel matches your CAD model exactly.
Structural Safety:
A steel structure isn’t just about supporting weight. It needs to make maintenance easy, keep water out, and prevent overheating.
Maintenance Access
Technicians need to reach the screen to replace modules or fix issues.
- – Rear maintenance: Catwalks or platforms with at least 600mm of width
- – Front maintenance: Accessible mounting points for tool-free module removal.
- – Safety features: Anti-slip grating on walkways, harness anchor points every 2 meters.
Waterproofing and Drainage
Water is the enemy of outdoor electronics. Your steel structure must include:
- – Rain shields at the top of the screen to divert water.
- – Drainage pipes or drip edges to channel water away from cabinets.
- – Anti-rust coatings and waterproof sealants at all joints.
- – A 1–2% incline on the structure’s “roof” to prevent water pooling.
Ventilation and Heat Dissipation
- Outdoor LED screens generate heat.
- – Leave 150–200mm of airflow space behind cabinets.
- – Use mesh or louvers in the frame to promote air circulation.
- Avoid enclosed pockets that trap heat.
Lightning Protection
A direct lightning strike can fry the screen’s electronics.
- – Lightning rods mounted above the screen’s highest point.
- – A grounding grid (ground resistance ≤ 10 ohms) to channel lightning safely into the earth.
- – Surge protection devices (SPDs) on every power branch to block voltage spikes.
How to Choose the Right Steel Materials ?
Not all steel is created equal. Outdoor curved LED structures require materials that balance strength, weight, and corrosion resistance. Here’s what to use:
Core Materials
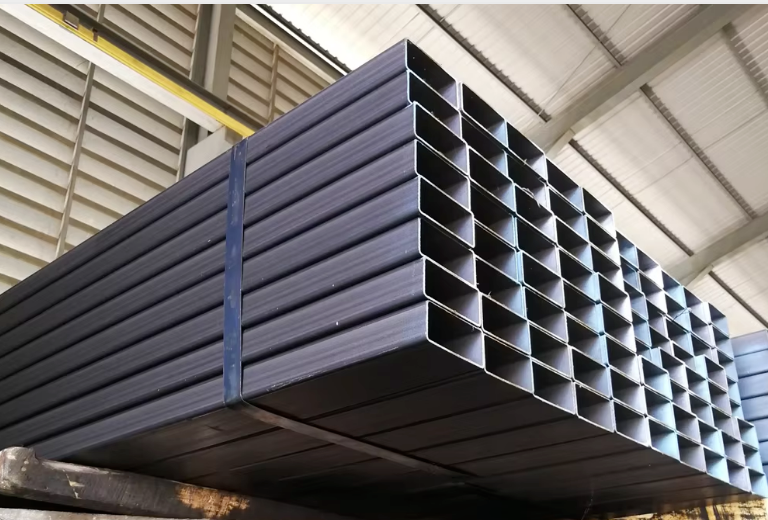
- – Square steel tubes : The workhorse of the structure. You can choose Q235 or Q355 grade steel. They offer excellent bending resistance and weldability, and they’re lighter than solid steel. Use these for the main frame and support ribs.
- – Angle steel: L-shaped steel used for reinforcement and connecting beams. It adds stability against lateral forces ,like wind pushing sideways.
- – Steel plates: Thick plates (3–10mm) used for base plates, mounting brackets, and curved backing panels. Laser-cut plates ensure precision for curved surfaces.
- – Hot-dip galvanized steel:Hot-dip galvanization coats steel with a zinc layer (80–120µm thick) that resists rust for 20–30 years. For extra protection in harsh coastal environments, you should add a polyurethane topcoat.
Connections: Welding and Bolting
A strong structure is only as good as its connections. Here’s how to get them right:
Welding Requirements
- – Use full-penetration welds for main beams
- – Use fillet welds for secondary frames (minimum thickness: 6–8mm, depending on load).
- – Test critical welds with ultrasonic inspection to check for cracks or weak spots.
Bolted Connections
- – Use grade 8.8 or 10.9 high-strength bolts for load-bearing joints.
- – Pre-tension bolts to at least 0.7× their minimum tensile strength.
- – Use stainless steel washers to prevent corrosion between bolts and steel.
Step-by-Step Installation Guide for Outdoor Curved LED Steel Structures
Even the best design fails with shoddy installation. You can follow this step-by-step process to ensure precision and safety:
Step 1: On-Site Survey and Alignment
Before you lift a single steel beam:
- – Use a total station or 3D laser scanner to map the installation site
- – Compare the real-world measurements to your CAD/BIM model.
- – Adjust your design to compensate for any site deviations before fabrication begins.
- Aim for a maximum deviation of ≤5mm—any more, and your curvature will be off.
Step 2: Install the Main Support Frame
Start with the vertical columns and main horizontal beams. It is the “skeleton” of the structure.
- – Check vertical alignment with a laser level: tolerance ≤ 1/1000 of the column height
- – tensile strength ≥10kN per bolt or concrete footings.
Step 3: Mount Curved Ribs or Arc Beams
- – Use the full-scale templates you created earlier to verify each rib’s curvature ;
- -arc deviation ≤3mm per meter.
- – Weld or bolt ribs to the main frame
- – checking -curvature continuously with a laser guide.
- – Ensure all ribs follow the same radius;
- – Cumulative deviation will ruin the screen’s visual flow.
Step 4: Install LED Cabinets
- – Start with center reference cabinets: Mount the cabinet at the midpoint of the arc first—this acts as your anchor for symmetry.
- – Expand outward symmetrically: Install cabinets to the left and right of the center, adjusting each for alignment.
- – Use fine-adjustment brackets: These let you tweak each cabinet by ±2–3mm in all directions to fix small gaps.
- – Check seams: Aim for horizontal and vertical gaps ≤0.5–1.0mm between cabinets. Use a feeler gauge to verify.
Step 5: Final Safety Checks
Before powering on the screen:
- – Test bolt torque to ensure no connections are loose.
- – Inspect welds for cracks or defects.
- – Verify grounding (use a multimeter to check resistance ≤10 ohms).
- – Test drainage by spraying water on the top of the structure—ensure water flows away from cabinets.
- – Do a load test: For large structures, add temporary weights to simulate wind or maintenance loads and check for deflection (maximum deflection ≤ L/250, where L is the beam length).
6. Final Inspection and Calibration
You’re almost done,but don’t skip this step.
- – Structural tests: Verify bolt torque, weld quality, frame deflection, and corrosion coating thickness.
- – LED screen calibration: Check module flatness with a laser level, validate curvature consistency, and run a white-balance test to ensure no visual gaps.
- – Weatherproofing test: Use a water hose to simulate heavy rain;check for leaks behind cabinets.
- – Lightning protection test: Verify surge protectors are installed correctly and grounding is secure.
Real Case Example: 23.552 m × 8.192 m Outdoor Curved LED Screen Project
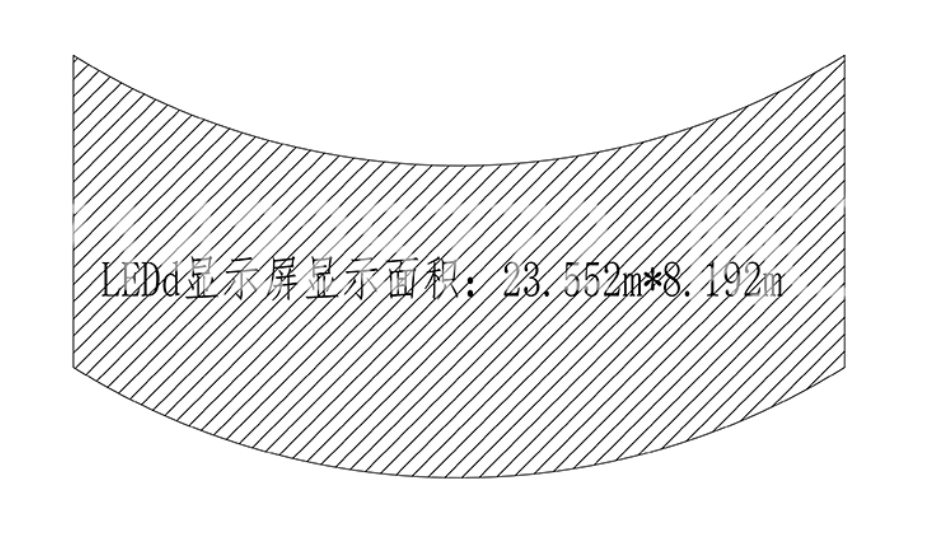
Below is a real engineering case of an outdoor curved LED screen:
- Display Size: 23.552 m × 8.192 m
- Border Size: 200 mm on all sides → Total framed size: 23.752 m × 8.392 m
- Curvature: 81° curved surface across the full width
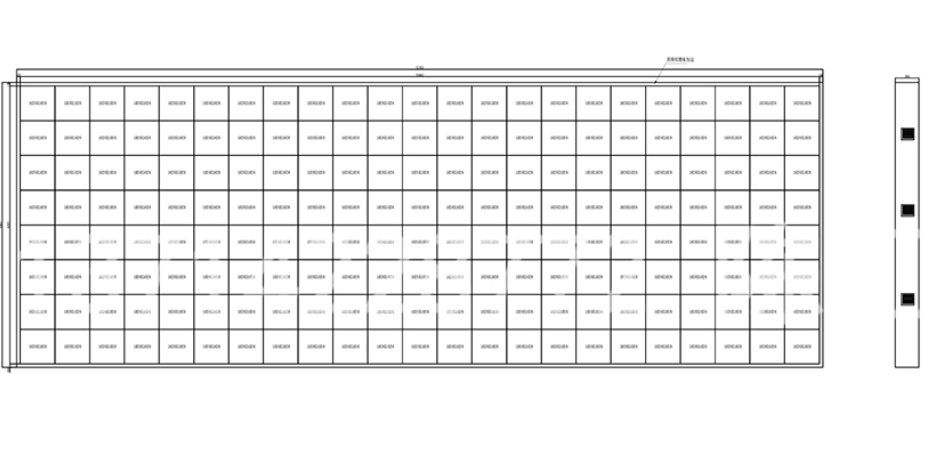
Installation Structure:
- LED cabinet backing: 40 × 40 mm square tubes
- Maintenance walkways: 40 × 20 mm square tubes
- Perimeter frame: 80 × 80 mm steel tubes
- Main structural frame: 80 × 40 mm rectangular tubes
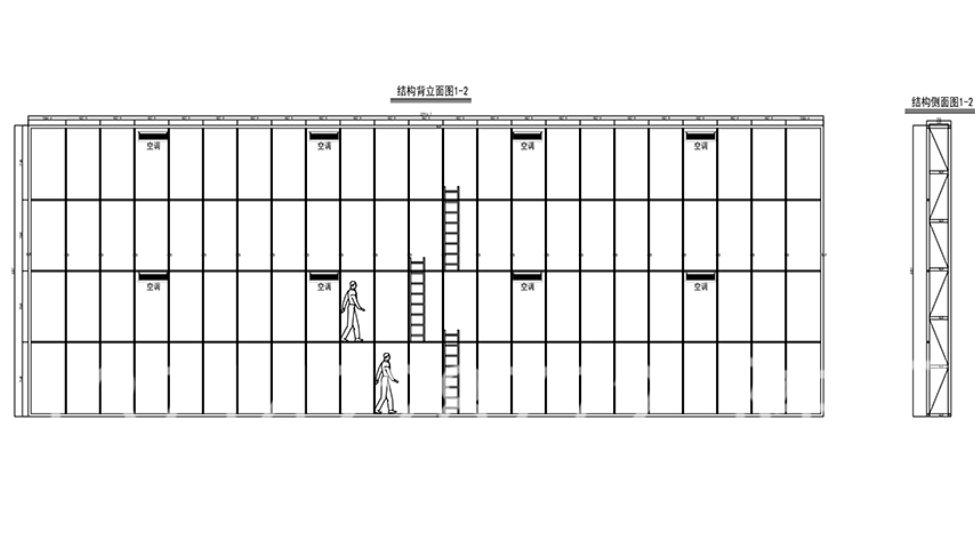
- Maintenance Access:
- Four-layer rear maintenance channels for power, cabling, and module service
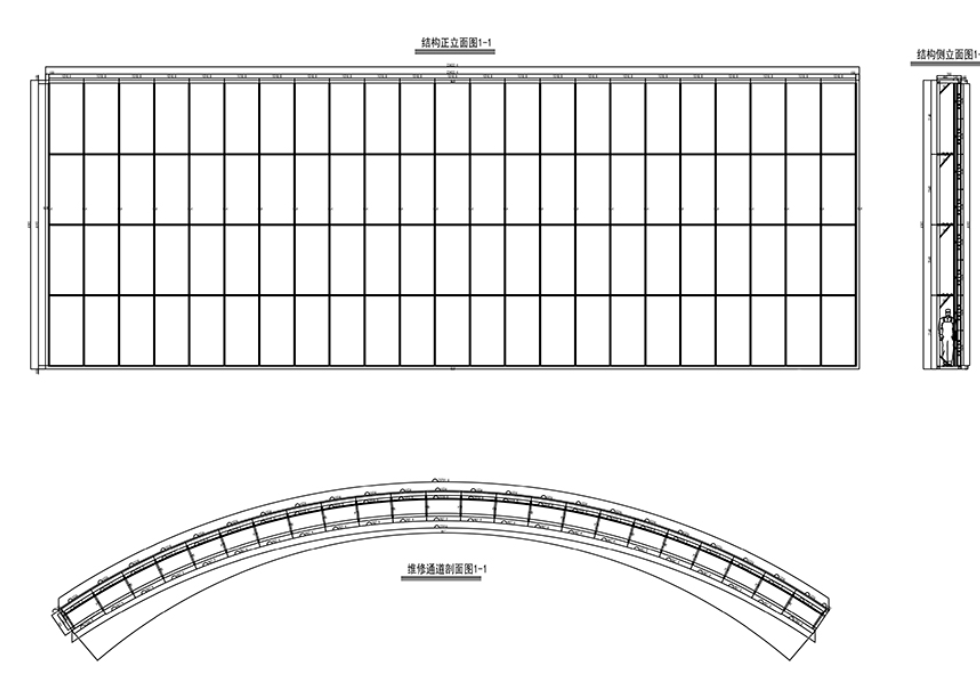
Key Engineering Features:
- CNC-made curved ribs to ensure accurate 81° arc
- Multi-layer support frame designed for outdoor wind load
- Easy-access catwalks for safe long-term maintenance
- Tight cabinet alignment to maintain smooth curvature
Summary:
Designing and installing an outdoor curved LED screen and its steel structure isn’t just about bending a display. As a professiona led display manufacturer, If you would like, I can also help you.